Tuesday, July 6, 2010

part one: table top

if you read carefully, you would have read that i had a coffee table to do and that i wanted to do it before may. what i really meant was before august. so here we are.

this table is a commission for some friends of ours who recently got married. the design is based on a jens risom table from 1959.


i've tweaked the design a bit, but i've also kept the principal elements of it. one thing that really drew me to this table is the elegant base with the floating top. another detail that we (claire and i) really liked was the rap-around pencil roll.

i finished the top yesterday, so i thought that i would give a little photo tour of it.

here are the two planks that will make up the table. the one in the foreground has produced the parts for the base; and the other, the top. the one is a little darker then the other, a fact that i'll accentuate with the finish.


the old fashioned way, or i don't have any other way to do it.


i split the portion of the one plank for the top on an angle to get at a more rift sawn face. there is some really nice color in this piece.


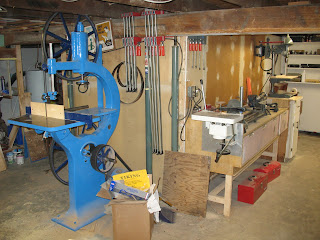
sawing the veneers on my old beast of a saw. things got a little hot on the top wheel. live and learn.


i veneered this using some torsion boxes and clamps and cauls. it went pretty well.


the top received some applied edges with the pencil roll shaped into them. these and the top received a groove to align the parts come glue up.


my beloved mouse from mr. don. a most handy tool indeed. here it was used to mark where the top and the applied edge meet.


the initial profile was wasted out on the router table. after this, there was alot of hand work to bring the shape into existence.


some of the tools used to carve the inside corner of the pencil roll. i debated whether or not a miter in the corner would be advantageous in this situation, but i decided against it.


after the shape was in the applied edges, it was off to finishing. i wanted to keep the top light, so i went with shellac and wax. i've got about 15 coats of shellac, and i'm still waxing. the table will come with it's own set of custom coasters.


the top has a series of slip matches on both sides of center and then a random match down the middle. the random match was by far the nicest option. it created a sort of an eye in the center of the table and some nice tan lines running almost parallel along the length of the table.


Tuesday, June 1, 2010

take parts and just add beer...

i spent the first two weeks in may at the inside passage school, and i had the time to finish my box.

most of the work was done by hand, with the exception of the bottom panel rabbet, partition grooves, and mortises. this was not for some grand spiritual reason, it was mostly because the machines were off at night.

this was my third go around at the school at this time of year, and i must say, it is my favorite time. the evenings in the shop, with a small group of people working hard to finish projects is downright invigorating.

sorry i don't have any more detail photos of the joints, i left the camera at home.


Saturday, April 24, 2010

parts is nice

i'm glad to have some wooden parts on my bench.

i've been wanting to make the all end grain corner box joint for a while now, and i figured this was as good a time as any. the joints have all been laid out and are just waiting for me to cut them. as with the other japaness joints i've tried, this one needs alot of focus to layout as it's not the kind of thing where you cut one side out and lay it over to trace the other. you kinda got to go for broke and lay out both sides at once and hope the fitting goes well.

the box sides need to go together from the top/bottom, so the bottom of the box needs to sit in a rabet. this means some veneer for the bottom panel. the top is going to be solid, and i'm going to let it sit for as long as possible to stabilize.

so far the wood has been behaving nicely. the maple planes beautifully and has a really nice quarter sawn shimmer to it. this little plank (the one on the saw horses in the last post) came from my grandfather's land, and has been sitting in my uncle's shop for more then a decade. needless to say, it is thouroughly dry.


Tuesday, April 13, 2010

little tour

well, the shop is as much done as shops tend to be. there are only a few minor things left to do, things like a sharpening station and rest for the grinder, and a lumber rack would be nice. so i thought i would give you folk a little tour.

i even cut out pieces for a project.

here's my bench with wagon vise in the end. this was built out of common 2''x12'', a found vise and a veneer screw.


the bench is in the back corner on the right, my toolbox is on the left, behind the drill press.


here's my cobbled together mortiser/lathe. the motor looks like frankenstein because i'm using a four way switch to reverse the direction for either operation. this works well, but there is a little flex in the setup, so one has to mortise lightly.


it's quite lovely to finally be using this saw. it's not without bugs, but it works well.


jointer, also not without bugs, but quite a machine.


started to haul wood in, makes it look more like a shop.