Tuesday, November 9, 2010

musée des arts décoratifs

we went to the museum the other day when we were in paris. it was pretty nice. they had this mobi boom exhibit going on, so we went to see it. it was just ok. there were a few wooden pieces in it, a wall desk that i really liked, but most of it was kinda like what the guy below is sitting on. lots of 'new' materials and metal, and strange plush sofas.


the rest of the museum was pretty fantastic, although i missed a bunch of it due to inattention. spent a bit of time in the art deco room where they had alot of ruhlmann on display, maybe eight pieces or so. it was pretty neat to see the pieces first hand.

doors didn't stay flush back then either.


this was a big tabletop, around four feet by six or seven.


this piece was pretty cool too. all compound curved surfaces, and lots of curved glass. a big, imposing piece by marcel coard, from 1915.


this one's called 'chiffonier' by andré groult from 1925. all leather over compound curved substrate.


needless to say, they had some neat stuff in this museum. visiting is fun and all, but i miss being in my shop.

Friday, September 24, 2010

spain

claire and i went to ireland last week, and were lucky enough to spend the weekend with the wonderful spain clan. we had a great time, one might even say the perfect vacation, because it involved both wood and machine shopping, and the food was wonderful.

fergal brought us to the local lumber yard which was mostly full of exotics like sapele and iroko, with some american woods like cherry and walnut, and then there was a stack of oak that just needed some going through. so we went through the pile, and picked out two sets of three sister planks. it was pretty fun going through a pile of lumber with fergal, and we ended up finding some nice pieces, but they stayed behind.


these are some photos of fergal's shop. he has a really nice space to work in. detached from the house with some nice windows and big access doors. in this photo you can see a wine rack that is close to being finished.


this is the machine that we went shopping for. it's a viceroy bowl lathe that is soon to be a mortiser. the business end of the spindle has a morse #3 taper that will take a chuck, and then some sort of table with shims will be used in conjunction with free hand mortising. this is a stout little machine which should serve well as a mortiser.


here's an overall of the shop. wood storage is to the right and the mortiser is just out of the left hand side of the frame, with a ten inch jointer-planer in the foreground.


Friday, September 10, 2010

cour à bois

claire and i were out for a stroll the other day in france, and guess what i saw... that's right, big ol' boules. so i went to check it out some more today.

most of the stuff i saw was flitch cut. the majority of what they had was sapele, sipo (a close relative to sapele, only more stable and not quite as dark... this is what i was told), some mahogany, ash, white and red oak, iroko, and some more regular construction stuff.

wood here is sold in cubic meters, like in japan. hard to visualize this measure. buddy at the yard was telling me that a cubic meter of sapele is worth something like 1100 euro. he broke it down to this: a meter wide piece of sapele, four meters long, not sure how thick but at least an inch, went for 200 euro, about 260$ CND. not too bad.

but they did not have any boxwood, so i'll have to visit some more lumber yards. oh well.


in this last photo, the pile is about four feet wide, and probably twelve quarter. i think this was sapele.


Saturday, September 4, 2010

i could be a footnote

lark books has just published it's new book in the 500 series. i got in it with my spalted maple cabinet (http://endgrain.ca/gallery1.htm). lots of people from inside passage have pieces in this book as well. it's a nice book. maybe i'll get to be a footnote someday.
the things one aspires to...


Wednesday, August 4, 2010

view from the base-ment

i swear this was done in july. this is the first project that i have fully completed in my shop, and it was a good learning experience as to how to work in the space. the main lesson: get rid of all the junk, and get more space. haven't figured out how to make the basement bigger yet.

after the top was done, it was time to move on to the base. everything was mostly mocked-up and decided, but i did leave room to move, and put a few things through the planer after all the joinery was complete and i had a better idea of the weights.

everything starts with the layout. a good trick i learnt from lord godfrey is to use envelope stickers to mark stuff out on dark woods. works like a charm.


the long rails have a slight angle on the ends of them. i put the joinery parallel to the rail and angled in the legs. consistent spacing between the tenons is gotten by using a spacer to go from the top one to the bottom one. this operation happens 24 times, i'll spare you the photos.


fitting the tenons. i did a bunch of them by hand because i don't have a round over bit for every size. it took a while... and then daisuke said, ''don't you have a chamfer bit''. so smart.


everything in this photo is dry fit. that means that the joinery is all done, but no glue has been applied yet. at this stage i marked out what needed to get some shape and had a better look at the whole thing with the top.


the shaping for the three short rails was done on the drill press. such a nice detail and so easy to do. this accentuates the floating of the top.


after all the shaping was done to the legs and correspondingly to the rails, it was time for getting a finished surface. daisuke brought a few shapton stones on his visit, which he was gracious enough to leave with me, and boy oh boy, my planes have never worked to nicely. thanks daisuke.


all the parts got finished before the glue up. at this point, i find it hard to let the finish cure long enough. i just want to glue the thing together... cooler heads prevailed and i waited.


the glue ups went very well. i broke this down into six glue up. it went just like butter.


the finale glue up.


i tried something new to me for attaching the top to the base. these elongated washers are from lee valley and offer hidden attachment. since the top floats, i thought that these would be more fitting for this table.


... and here it is, all done, and before august ...


Tuesday, July 6, 2010

part one: table top

if you read carefully, you would have read that i had a coffee table to do and that i wanted to do it before may. what i really meant was before august. so here we are.

this table is a commission for some friends of ours who recently got married. the design is based on a jens risom table from 1959.


i've tweaked the design a bit, but i've also kept the principal elements of it. one thing that really drew me to this table is the elegant base with the floating top. another detail that we (claire and i) really liked was the rap-around pencil roll.

i finished the top yesterday, so i thought that i would give a little photo tour of it.

here are the two planks that will make up the table. the one in the foreground has produced the parts for the base; and the other, the top. the one is a little darker then the other, a fact that i'll accentuate with the finish.


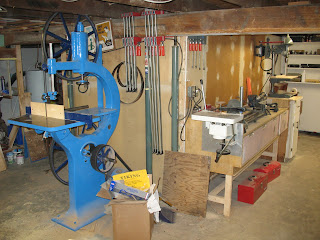
the old fashioned way, or i don't have any other way to do it.


i split the portion of the one plank for the top on an angle to get at a more rift sawn face. there is some really nice color in this piece.


sawing the veneers on my old beast of a saw. things got a little hot on the top wheel. live and learn.


i veneered this using some torsion boxes and clamps and cauls. it went pretty well.


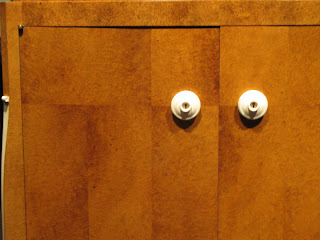
the top received some applied edges with the pencil roll shaped into them. these and the top received a groove to align the parts come glue up.


my beloved mouse from mr. don. a most handy tool indeed. here it was used to mark where the top and the applied edge meet.


the initial profile was wasted out on the router table. after this, there was alot of hand work to bring the shape into existence.


some of the tools used to carve the inside corner of the pencil roll. i debated whether or not a miter in the corner would be advantageous in this situation, but i decided against it.


after the shape was in the applied edges, it was off to finishing. i wanted to keep the top light, so i went with shellac and wax. i've got about 15 coats of shellac, and i'm still waxing. the table will come with it's own set of custom coasters.


the top has a series of slip matches on both sides of center and then a random match down the middle. the random match was by far the nicest option. it created a sort of an eye in the center of the table and some nice tan lines running almost parallel along the length of the table.


Tuesday, June 1, 2010

take parts and just add beer...

i spent the first two weeks in may at the inside passage school, and i had the time to finish my box.

most of the work was done by hand, with the exception of the bottom panel rabbet, partition grooves, and mortises. this was not for some grand spiritual reason, it was mostly because the machines were off at night.

this was my third go around at the school at this time of year, and i must say, it is my favorite time. the evenings in the shop, with a small group of people working hard to finish projects is downright invigorating.

sorry i don't have any more detail photos of the joints, i left the camera at home.


Saturday, April 24, 2010

parts is nice

i'm glad to have some wooden parts on my bench.

i've been wanting to make the all end grain corner box joint for a while now, and i figured this was as good a time as any. the joints have all been laid out and are just waiting for me to cut them. as with the other japaness joints i've tried, this one needs alot of focus to layout as it's not the kind of thing where you cut one side out and lay it over to trace the other. you kinda got to go for broke and lay out both sides at once and hope the fitting goes well.

the box sides need to go together from the top/bottom, so the bottom of the box needs to sit in a rabet. this means some veneer for the bottom panel. the top is going to be solid, and i'm going to let it sit for as long as possible to stabilize.

so far the wood has been behaving nicely. the maple planes beautifully and has a really nice quarter sawn shimmer to it. this little plank (the one on the saw horses in the last post) came from my grandfather's land, and has been sitting in my uncle's shop for more then a decade. needless to say, it is thouroughly dry.


Tuesday, April 13, 2010

little tour

well, the shop is as much done as shops tend to be. there are only a few minor things left to do, things like a sharpening station and rest for the grinder, and a lumber rack would be nice. so i thought i would give you folk a little tour.

i even cut out pieces for a project.

here's my bench with wagon vise in the end. this was built out of common 2''x12'', a found vise and a veneer screw.


the bench is in the back corner on the right, my toolbox is on the left, behind the drill press.


here's my cobbled together mortiser/lathe. the motor looks like frankenstein because i'm using a four way switch to reverse the direction for either operation. this works well, but there is a little flex in the setup, so one has to mortise lightly.


it's quite lovely to finally be using this saw. it's not without bugs, but it works well.


jointer, also not without bugs, but quite a machine.


started to haul wood in, makes it look more like a shop.

Friday, January 29, 2010

movement of sorts

i've made some progress in the basement, namely i put some insulation on the wall and then some drywall, and i also made some windows and put those in. and just yesterday i wired for the jointer and the bandsaw. i still need a starter for the bandsaw motor, trying to find heaters for an old one i've got, but that's been a dead end so far... i won't bore you folks with my list, but it's both moving along and i still have loads to do at the same time. anyhow, the plan is to have a coffee table made down in the basement by may.

here's a more recent shot of the saw. can't wait to cut something.